Services Overview
- Authentik & Access
- Vaultwarden: Your Password Box
- PsiTransfer: Quick & Private File Sharing
- SnapOtter: Your Private File Workshop
- Zipline & ShareX
- Forgejo: Git server
Authentik & Access
Who can use this: Everyone.
1. What is Authentik?
Authentik is the central security hub for this server. Think of it as your universal key.
Instead of creating a separate username and password for every tool (like Forgejo for code, Immich for photos, Vaultwarden for passwords), you log in once with Authentik. It then securely tells every other service who you are. This means:
-
You only remember one password.
-
Your Multi-Factor Authentication (MFA) works everywhere automatically.
-
If you ever lose your password, you only need to reset it in one place.
2. How to Log In to Services
When you open a service, you will be asked to log in.
Always use your Authentik account.
Different software projects use different technical names for this "single login" feature. You might see buttons labeled:
-
SSO (Single Sign-On)
-
OIDC (OpenID Connect)
-
OAuth2 / OAuth
-
OpenID
-
Federated Login
-
Login with Provider
-
Sign in with...
Don't be confused by the names! They all mean the same thing here: "Click this to use your main server account."
Important Warning: I have tried to make SSO the only option, but unfortunately, not all services support this perfectly. Some applications might still show a standard "Username/Password" box with the option for SSO somewhere on the page.
-
DO NOT create a new password or enter your Authentik password in these boxes.
-
LOOK for a small link or button nearby saying "Log in with SSO," "Use External Provider," "OIDC," or similar as explained above.
3. Who Can Access What?
Not all services are available to everyone. Think of each service as a private room in a big house.
-
Even if you have a key to the front door (your Authentik account), you can only enter rooms where you have been invited.
-
Some tools are only for specific family members, friends, or project groups.
-
If you try to access a service and get an error (like "Access Denied" or "Unauthorized"), it means you are not on the list for that specific room.
-
To get access: Simply contact the owner. Tell me which service you need, and I may add you to the list.
Vaultwarden: Your Password Box
Who can use this: Everyone with an account on our server.
What is a Password Manager?
Imagine a digital safe that only you can open. Instead of remembering many different keys (passwords) for every door (website), you only need one strong key to open the safe. Inside, the safe keeps all your other keys safe and organized.
A password manager:
-
Creates strong, hard-to-guess passwords for you.
-
Remembers them so you don't have to.
-
Fills them in automatically when you need to log in.
What are Vaultwarden and Bitwarden?
Bitwarden is a famous, free, and open-source password manager used by millions of people. It is the official company that makes the apps you see on phones and computers.
Vaultwarden is a lightweight version of the Bitwarden server. It is built by the community to run on smaller computers, like our homeserver.
-
The Magic: You use the official Bitwarden apps, but instead of saving your data on Bitwarden's big cloud servers, your data stays here on our private server. You get the same great app, but with more privacy and control.
Why is this better than remembering passwords yourself?
If you manage passwords on each device separately (like saving them only in Chrome or only on your iPhone):
-
❌ Confusion: You might forget a password you saved on your phone when you sit at your computer.
-
❌ Risk: If you lose your device, you lose all your logins.
-
❌ Limits: It is hard to use special security codes (TOTP) or new Passkeys when switching between different types of devices (like from an iPhone to a Windows PC).
With our centralized Vaultwarden:
-
✅ One Truth: Change a password on your phone, and it instantly updates on your laptop.
-
✅ Safety: Your data is backed up on our server. If you lose a device, your passwords are safe.
-
✅ Freedom: Features like TOTP (those 6-digit changing codes for extra security) and Passkeys work everywhere. You are not stuck using only Apple or only Google products.
How to Start Using It
You do not download a "Vaultwarden" app. You download the official Bitwarden apps.
⚠️ Important: The links below go to external official websites (like the Apple App Store, Google Play Store, or Bitwarden's website). These sites are not part of our local server. They are safe, official sources from the Bitwarden company.
Step 1: Download the App
Choose the app for your device:
-
For your Web Browser (Chrome, Firefox, Edge, Safari):
-
For your Phone or Tablet (Android, iOS):
-
For your Computer (Windows, Mac, Linux):
Step 2: Connect to Our Server
This is the most important step! By default, the app tries to connect to the public cloud. You must change this to connect to our private server.
-
Open the Bitwarden app you just installed.
-
Look for a button that says Settings (often a gear icon ⚙️) or Self-hosted environment.
-
Find the field labeled Server URL or Self-hosted API URL.
-
Type in our server address exactly:
https://pass.necc.me -
Save the settings. The app might restart.
Step 3: Log In with Your Account
Since you already have an account on our server, we use a special "Single Sign-On" method. This means you use the same login you use for other services on our server.
⚠️ Don't be confused by the name "Enterprise"! In the Bitwarden app, the button for this type of login is called "Enterprise Single Sign-On" .
- Do not worry: This is just the technical name Bitwarden uses for this feature.
How to log in:
-
Open the app and enter your email address. Click Continue.
-
On the next screen, click the button that says Enterprise Single Sign-On.
-
You might be asked for an SSO Identifier. If it logs you in automatically without asking, that is great!
-
You will be redirected to our familiar login page (Authentik). Log in with your usual username and password.
-
-
If this is your first time, you will be asked to create a Master Password. This is a special password just and only just for your Bitwarden app. Do not forget this! It unlocks your safe. If you loose this, it is unrecoverable, do not even ask the server owner, it is permanently lost. This is by security design.
- Write down your Master Password to a piece of paper and keep it safe!
PsiTransfer: Quick & Private File Sharing
Who can use this: Everyone, no account needed.
What is Temporary File Sharing?
Sometimes you need to send files that are too big for email, or share sensitive documents that shouldn't stay online forever.
-
Temporary sharing is like giving someone a package that disappears after they open it or after a set time.
-
Benefits: It keeps our server clean and fast. It is safer because old files do not stay online where they could be found later. It is perfect for sending large work documents, design files, or private data that only needs to be shared once.
What is PsiTransfer?
PsiTransfer is our simple, self-hosted tool for sharing files.
-
It lets you upload big files easily (even larger than 1 GB).
-
It creates a special link that you can send to anyone.
-
It is designed to be private and secure.
Secure file transfer:
This is why PsiTransfer is great:
-
GDPR Compliant: Because files are deleted automatically, we follow strict European privacy rules. We do not keep your data longer than necessary.
-
Password Protection: You must set a password for every upload.
-
Server Owner Cannot See: Even the owner of this server cannot see into the content of your files. The list of files is encrypted in your browser before it reaches our server. If you lose the password, the files are gone forever (even for us!). This ensures total privacy.
How to Use It
Using PsiTransfer is very simple.
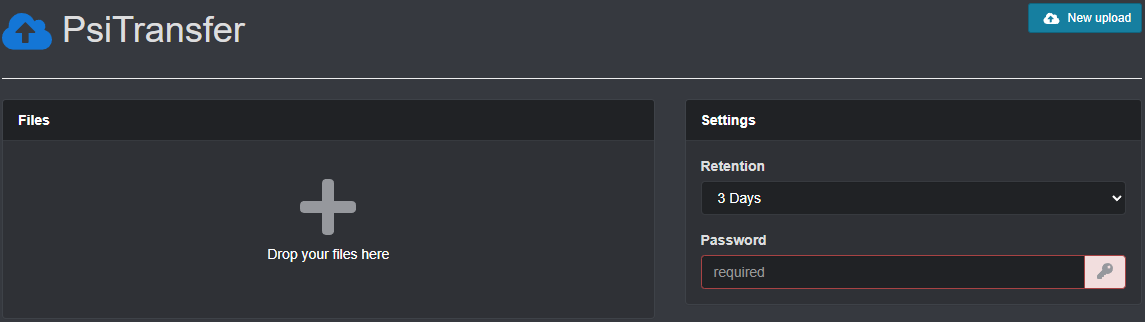
- Go to the website: Open your browser and visit https://file.necc.me
-
Select Files: Click the + button or drag and drop your files into the box.
-
Set a Password:
-
You must enter a password to protect your files.
-
Tip: You can use any password you like! It does not need to be complex (e.g., "pizza" is fine). Just make sure to tell the person you are sending it to what the password is.
-
-
Choose How Long to Keep:
-
You cannot keep files forever. You must choose a time (like 1 day, 1 week) or "One-time download" (deletes immediately after the first person downloads it).
-
-
Upload: Click the Upload button.
-
Share: You will get a special link. Send this link and the password to your friend or colleague.
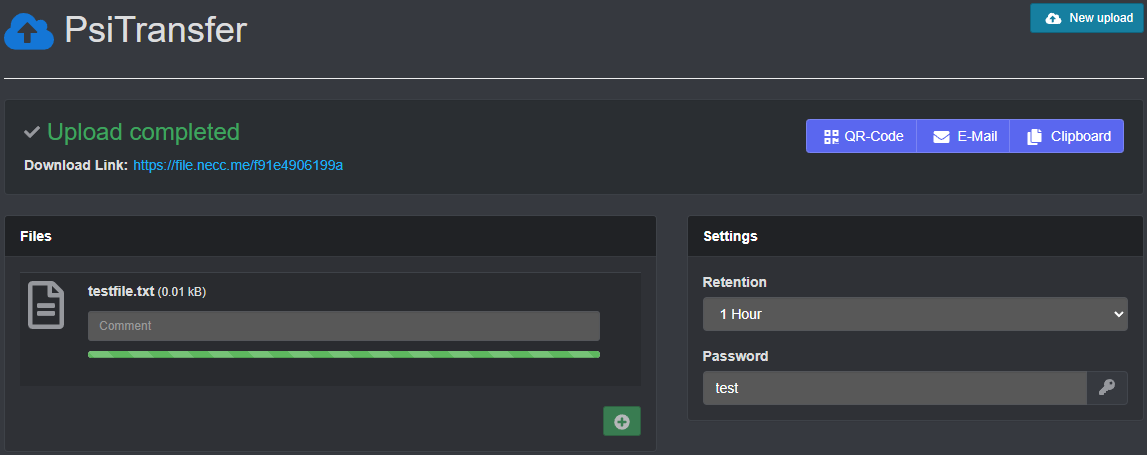
Once the time is up or the file is downloaded (if you chose one-time), the files are deleted automatically!
SnapOtter: Your Private File Workshop
Who can use this: Everyone with an account on our server.
⚠️ The Risk of Online File Editors
Many people use free websites to edit photos, convert PDFs, or compress videos. It is easy and fast, but there is a hidden cost: your privacy.
- You lose control: When you upload a file to these sites, you send a copy to their servers.
-
They see everything: Most of these services do not have "end-to-end encryption." This means the company (and its employees) can technically see your documents, photos, and data.
-
Data selling & AI: Many free services make money by selling your data or using your uploaded files to train their Artificial Intelligence (AI) models. Your private family photos or sensitive work documents could become part of a public AI dataset without you knowing.
What is SnapOtter?
SnapOtter is our safe, private alternative. It is a powerful "file workshop" that runs entirely on our server.
-
Your files stay home: When you use SnapOtter, your files never leave our network. They are not sent to a third-party company.
-
Huge Toolkit: It includes over 200 tools for images, videos, audio, PDFs, and documents.
-
Smart Features: It uses local AI to do things like remove backgrounds from photos, improve image quality, read text from images (OCR), or even transcribe audio to text—all without sending data to the cloud.
Key Features You Can Use
SnapOtter is like having a professional studio in your browser:
-
🖼️ Images: Resize, crop, compress, convert formats (even RAW camera files), add watermarks, create GIFs, or remove objects/people from photos.
-
📄 PDFs: Merge, split, compress, convert to/from Word, add passwords, or sign documents.
-
🎥 Video & 🎵 Audio: Convert formats, compress size, or extract audio from video.
-
🤖 Local AI: Remove backgrounds, upscale blurry photos, restore old pictures, or transcribe voice notes to text.
-
🔄 Batch Processing: Do the same thing to 50 files at once (e.g., resize 50 photos instantly).
How to Use It
Using SnapOtter is easy and works right in your web browser.
- Go to the website: Open your browser and visit https://snapotter.necc.me.
-
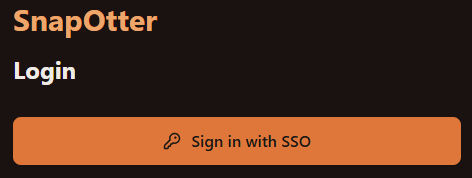
Log In: You will see a login screen. Click the button Sign in with SSO.
-
Pick a Tool: On the top side, you will see categories like "Image," "PDF," "Video," etc. Click on one to see the tools.
-
Upload & Edit: Drag and drop your file(s). Choose the settings you want (e.g., "Compress to 50%" or "Remove Background").
-
Download: Click the process button. When it is done, download your new file. The original and the result stay only on our server and are cleaned up automatically after a while.
Zipline & ShareX
Your Private Screenshot Tool: Zipline & ShareX Guide
Who can use this: Everyone with an account on our server.
Taking screenshots and sharing them is now instant, private, and free. By using our self-hosted Zipline server with the ShareX tool, you avoid the privacy risks, file deletion, and subscription fees of public services like Imgur. Your data stays on our server, links never expire unexpectedly, and the process is automatic: snap a picture, and the link is instantly copied to your clipboard.
Why Public Services Are Risky and Limiting
Using free online tools to share images often comes with hidden costs and dangers that affect your privacy and convenience.
-
Privacy Issues: When you upload to public sites, companies can scan your images for advertising or train AI models with your personal data. Your files are often public by default and can be found by strangers.
-
Link Rot and Limits: Free services often delete your files after a few months of inactivity, breaking your old links. They also compress your images to save space, making them look blurry, and restrict file sizes.
-
Subscription Traps: Many services start free but force you to pay monthly fees for basic features like higher quality or more storage. They lock you into their ecosystem, making it hard to leave.
-
Security Risks: Storing data on big corporate servers makes you vulnerable to large data breaches where your personal information could be exposed.
Why Our Self-Hosted Zipline Is Better
Zipline is a tool we run on our own server, giving you full control and a better experience without the downsides of public websites.
- You Own Your Data: Your files are stored on our private server, not a third-party company's computer. You decide who sees them and how long they last.
-
No Fees or Limits: There are no monthly costs. You can upload any image or video file type, and the only limit is our server's storage, which is much larger than free public tiers.
-
Advanced Features: You can create links that expire automatically, protect files with passwords, or limit how many times a link can be viewed.
-
Perfect Workflow: Integrated with ShareX, it makes sharing effortless. You take a screenshot, and it automatically uploads and copies a short link to your clipboard in seconds, ready to be instantly shared with friends.
Step-by-Step Setup Guide
1. Log In to Zipline
-
Open your web browser and go to
https://ss.necc.me. -
The system recognizes you automatically. You will be logged in instantly via Authentik Single Sign-On (SSO) using your existing account.
-
Else it will redirect you to our main authentication page; just confirm your identity there.
-
2. Get Your Configuration File
Before installing any software, you need to download a special settings file from Zipline.
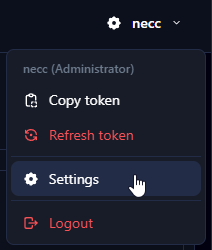
- Once logged in, look for your username in the top-right corner of the screen.
-
Click it and select "Settings".
-
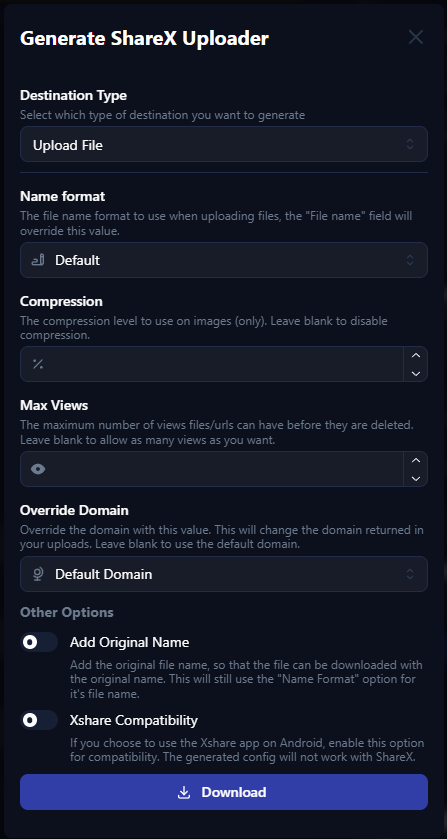
Scroll down until you see the "ShareX" section under "Generate Uploaders".

-
Click the "Download" button. This saves a small file (ending in
.sxcu) to your computer. This file contains your unique key.
3. Download and Install ShareX
Warning: Only download ShareX from its official website to avoid viruses. Do not use other sites.
- Go to
https://getsharex.com/in your browser. - Click the big "Download" button and run the installer file.
- Follow the simple steps to install it on your computer.
4. Connect ShareX to Zipline
Now you will tell ShareX to use our server for your uploads.
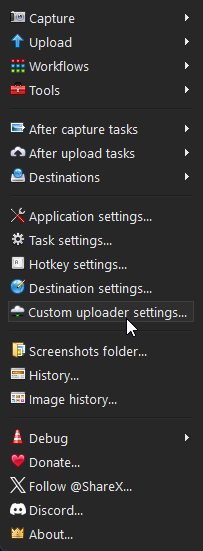
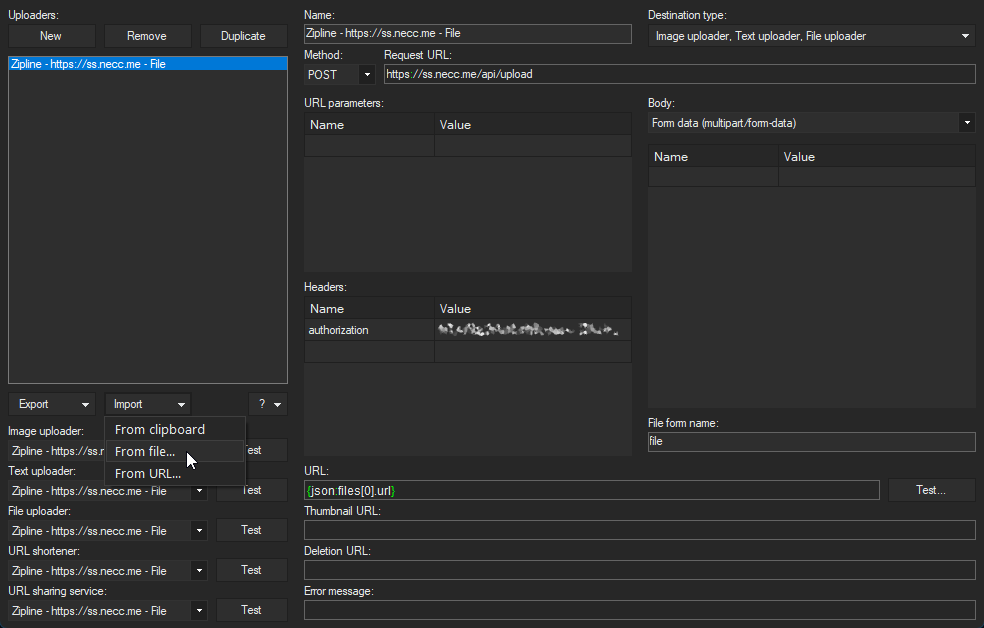
- > Import > From file... and select the
.sxcufile you downloaded in Step 2 or you can drag and drop the downloaded.sxcufile into the Uploaders: window.
5. Enable Automatic Uploads
To make sure every screenshot is uploaded and the link copied automatically, check these two settings.
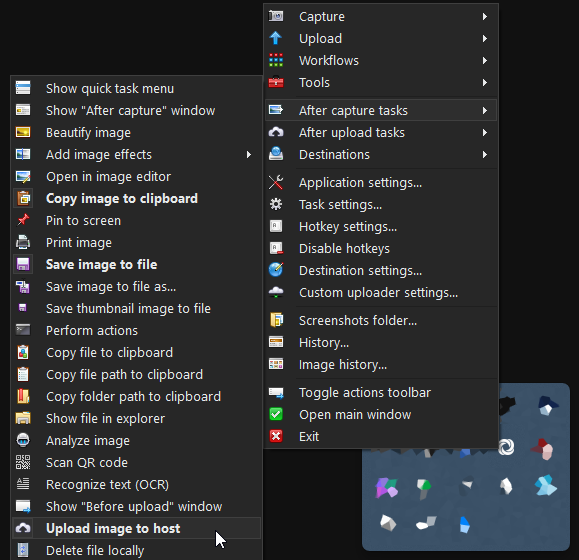
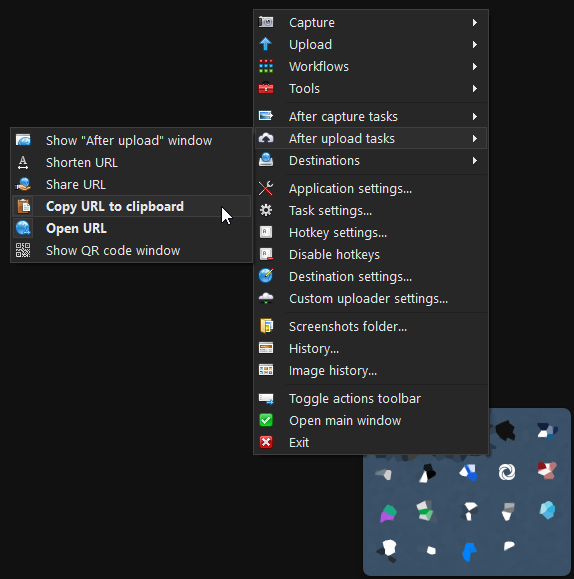
- Look for the "After upload tasks" menu. Ensure "Copy URL to clipboard" is checked.
-
- Optional: You may select the "Open URL" to open your web browser with the captured image.
- Test it: Press the
Print Screenkey or use the "Capture" button to take a screenshot of a small area. -
-
Wait a moment for the upload notification. Then, try pasting (
Ctrl+V) into a chat or document. You should see a short link to your image!
-
Forgejo: Git server
Who can use this: Everyone with or without an account on our server.
Forgejo on Our Home Server — A Friendly Guide
Short version: Our home server now runs Forgejo, a place where we keep saved copies of files and code, with a history of every change. You don't need to be a tech person to look around — you can browse everything without logging in (top left "Explore"). To log in, use the top right "Login" button, which goes through Authentik (the same login you use for Bookstack and everything else on this server). If you see a red "HTTP 500" error after logging in, it is a known bug — ignore it, you are logged in. Just go back, or clean up the address bar.
What is Git? (In plain words)
Think of Git like a time machine for your files.
-
Every time you change a file and "save it to Git," it makes a snapshot — like a photo of the file at that moment.
-
You can look back and see who changed what, and when.
-
If you make a mistake, you can go back to an older version safely.
-
If two people work on the same file, Git helps them combine their changes without overwriting each other.
Why we host Git on our own server
Running Forgejo on our own machine (instead of using GitHub or a similar service) has a few clear benefits:
-
Privacy: Your files never leave our server. No outside company can scan, read, or sell your data.
- You are free to host private repositories.
-
No limits or prices: No ads, no subscription fees, no "you have used too much storage" emails.
-
You are in control: We decide who can see what, when updates happen, and how backups work. No one else can shut it down or change the rules.
A quick note: this is for advanced users
Please read this before using Forgejo.
Git and Forgejo are tools for people who write code or manage server settings. This documentation is intentionally simple and limited — it only explains the basics for non-tech users.
What is on this Forgejo instance?
-
This instance hosts public repositories that are used to run the services on our home server.
-
This was added as an afterthought, so it is limited right now.
-
It is a long-term work in progress.
How to use Forgejo
1. Just looking around? No login needed.
-
Open
https://git.necc.mein your browser. -
Click "Explore" in the top left corner.
-
You can now browse all the public repositories. That's it!
2. Need to log in?
-
Click "Login" in the top right corner.
-
You will be redirected to Authentik.
3. "HTTP 500" error
This is a known bug in the current version (v16). You ARE logged in, the error is just a display problem.
To fix the screen, do one of these:
-
Click "Go back" in your browser, or
-
In the address bar (top of the browser), delete everything after the last
/ingit.necc.me— so the address becomes just:https://git.necc.me/-
Press Enter. You should now see the normal Forgejo page.
-